Springboot06:SpringMVCAutoConfiguration源码分析
org.springframework.boot.autoconfigure.web.servlet.WebMvcAutoConfiguration
本节来看看SpringBoot中做了哪些SpringMVC的自动配置以及怎么样做的。
ContentNegotiatingViewResolver
首先看看ContentNegotiatingViewResolver。
作用:把所有的ViewResolver组合起来
通过调用initServletContext把容器中所有的ViewResolver组合起来
protected void initServletContext(ServletContext servletContext) {
    // 获得容器中的ViewResolver放入集合
    Collection<ViewResolver> matchingBeans = BeanFactoryUtils.beansOfTypeIncludingAncestors(this.obtainApplicationContext(), ViewResolver.class).values();
    ViewResolver viewResolver;
    // 如果当前viewResolvers为空
    if (this.viewResolvers == null) {
        // 初始化viewResolvers
        this.viewResolvers = new ArrayList(matchingBeans.size());
        Iterator var3 = matchingBeans.iterator();
        // 遍历这些matchingBeans的ViewResolver并添加到viewResolvers
        while(var3.hasNext()) {
            viewResolver = (ViewResolver)var3.next();
            if (this != viewResolver) {
                this.viewResolvers.add(viewResolver);
            }
        }
    } else {//不为空,如果viewResolvers没有matchingBeans的ViewResolver
        for(int i = 0; i < this.viewResolvers.size(); ++i) {
            viewResolver = (ViewResolver)this.viewResolvers.get(i);
            // 会获取namg,并通过工厂来初始化这样的
            if (!matchingBeans.contains(viewResolver)) {
                String name = viewResolver.getClass().getName() + i;
                this.obtainApplicationContext().getAutowireCapableBeanFactory().initializeBean(viewResolver, name);
            }
        }
    }
    AnnotationAwareOrderComparator.sort(this.viewResolvers);
    this.cnmFactoryBean.setServletContext(servletContext);
}
通过调用getCandidateViews,此函数中轮询所有的ViewResolver,来返回需要的View。
最终由DispatherServlet将ModelAndView传给ViewResolver视图解析器进行解析,ViewResolver解析后返回具体View;;
自定义ViewResolver
很简单,新建一个实现ViewResolver的类,在配置类中添加进去即可
FormattingConversionService
WebMvcAutoConfiguration中的mvcConversionService先从mvcProperties中获取format,调用addFormatters,把容器中以下类型的实例放入集合。
- Converters
- GenericConverter
- Formatter
addFormatters()->addBeans
public void addFormatters(FormatterRegistry registry) {
    ApplicationConversionService.addBeans(registry, this.beanFactory);
}

// addBeans:从工厂里面拿数据(GenericConverter\Converter\Printer\Parser)放入一个哈希Set
public static void addBeans(FormatterRegistry registry, ListableBeanFactory beanFactory) {
    Set<Object> beans = new LinkedHashSet();
    beans.addAll(beanFactory.getBeansOfType(GenericConverter.class).values());
    beans.addAll(beanFactory.getBeansOfType(Converter.class).values());
    beans.addAll(beanFactory.getBeansOfType(Printer.class).values());
    beans.addAll(beanFactory.getBeansOfType(Parser.class).values());
    Iterator var3 = beans.iterator();
    while(var3.hasNext()) {
        Object bean = var3.next();
        if (bean instanceof GenericConverter) {
            registry.addConverter((GenericConverter)bean);
        } else if (bean instanceof Converter) {
            registry.addConverter((Converter)bean);
        } else if (bean instanceof Formatter) {
            registry.addFormatter((Formatter)bean);
        } else if (bean instanceof Printer) {
            registry.addPrinter((Printer)bean);
        } else if (bean instanceof Parser) {
            registry.addParser((Parser)bean);
        }
    }
}
Converter
在获取的bean中,我们先谈谈Converter,Convert是一个接口,实现了Convert的接口都要实现一个convert方法,就是放入S类型返回T类型,即做到类型转化,例如将一个 字符串/JSON -> 一个类。
public interface Converter<S, T> {
    @Nullable
    T convert(S source);

    default <U> Converter<S, U> andThen(Converter<? super T, ? extends U> after) {
        Assert.notNull(after, "After Converter must not be null");
        return (s) -> {
            T initialResult = this.convert(s);
            return initialResult != null ? after.convert(initialResult) : null;
        };
    }
}
GenericConverter
GenericConverter也是一个接口,同样需要实现convert,其实和Converter没有实现关系。内部有一个静态内部类ConvertiblePair存放用于转换的类型。
public interface GenericConverter {
    @Nullable
    Set<GenericConverter.ConvertiblePair> getConvertibleTypes();

    @Nullable
    Object convert(@Nullable Object source, TypeDescriptor sourceType, TypeDescriptor targetType);

    public static final class ConvertiblePair {
        private final Class<?> sourceType;
        private final Class<?> targetType;

        public ConvertiblePair(Class<?> sourceType, Class<?> targetType) {
            Assert.notNull(sourceType, "Source type must not be null");
            Assert.notNull(targetType, "Target type must not be null");
            this.sourceType = sourceType;
            this.targetType = targetType;
        }

        public Class<?> getSourceType() {
            return this.sourceType;
        }

        public Class<?> getTargetType() {
            return this.targetType;
        }

        public boolean equals(@Nullable Object other) {
            if (this == other) {
                return true;
            } else if (other != null && other.getClass() == GenericConverter.ConvertiblePair.class) {
                GenericConverter.ConvertiblePair otherPair = (GenericConverter.ConvertiblePair)other;
                return this.sourceType == otherPair.sourceType && this.targetType == otherPair.targetType;
            } else {
                return false;
            }
        }

        public int hashCode() {
            return this.sourceType.hashCode() * 31 + this.targetType.hashCode();
        }

        public String toString() {
            return this.sourceType.getName() + " -> " + this.targetType.getName();
        }
    }
}
Formatter
Formatter主要作用是将一个类和一个字符串之间进行转换。(例如Date -> String)
或者从字符串parse获得实例
public interface Formatter<T> extends Printer<T>, Parser<T> {
}
mvcConversionService()
此时回过头看FormattingConversionService的mvcConversionService(),
@Bean
public FormattingConversionService mvcConversionService() {
    // 从mvcProperties拿到Format
    Format format = this.mvcProperties.getFormat();
    // 这里用了链式调用将DateTimeFormatters进行简单的格式装配,再作为参数传入WebConversionService的构造函数中
    WebConversionService conversionService = new WebConversionService((new DateTimeFormatters()).dateFormat(format.getDate()).timeFormat(format.getTime()).dateTimeFormat(format.getDateTime()));
    this.addFormatters(conversionService);
    return conversionService;
}
WebConversionService的构造函数
public WebConversionService(DateTimeFormatters dateTimeFormatters) {
    super(false);
    // 配置文件中是否配置了dateTime的格式,如果有将该格式加入
    if (dateTimeFormatters.isCustomized()) {
        this.addFormatters(dateTimeFormatters);
    } else {//如果没有,添加默认格式即可
        addDefaultFormatters(this);
    }
}
HttpMessageConverters
接口,用于把类的实例和Request\Response的 JSON 或者其他字符串之间做转换
MessageCodeResolver
接口,定义错误代码
ConfigurableWebBindingInitializer
类,初始化WebDataBinder
扩展Spring MVC配置
在原生Spring Boot AutoConfiguration还生效的前提下,取消自动配置的部分操作,自定义。
例如要添加一条url映射,则可以通过自己配置一个WebMvcConfigurer并实现addViewControllers来操作,取代RequestMapping(url)这样的配置。
@Configuration
public class MyWebConfigurer implements WebMvcConfigurer {
@Override
public void addViewControllers(ViewControllerRegistry registry) {
// 添加addViewController,取代RequestMapping(url)这样的配置
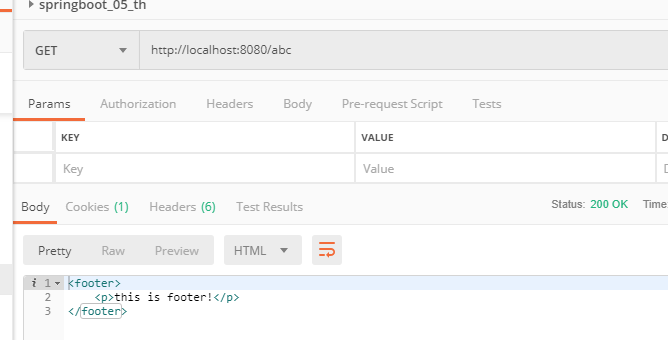
registry.addViewController("/abc").setViewName("footer");
}
}
此时就可以通过localhost:8080/abc这样的方式访问到footer文件了
扩展配置执行的原理
在WebMvcAutoConfiguration内部,有一个适配器类WebMvcAutoConfigurationAdapter,也有@Configuration,所以这个类会参与配置。
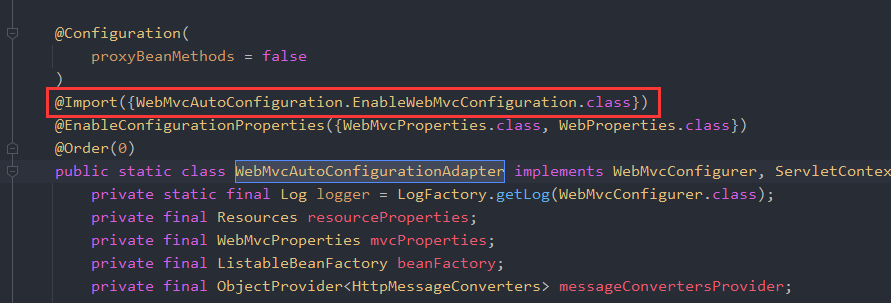
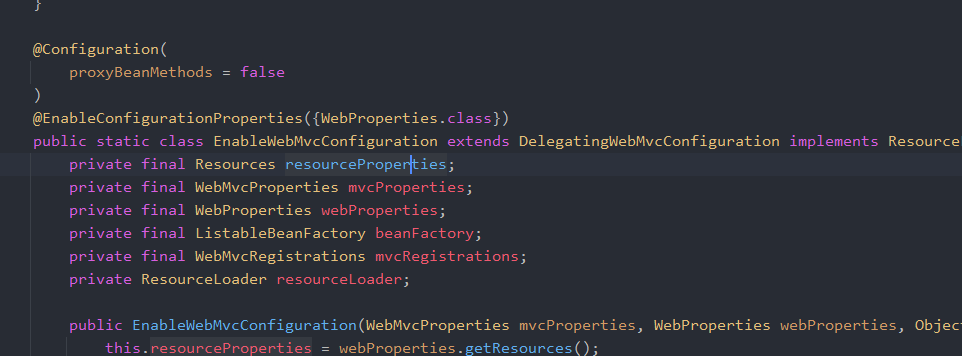
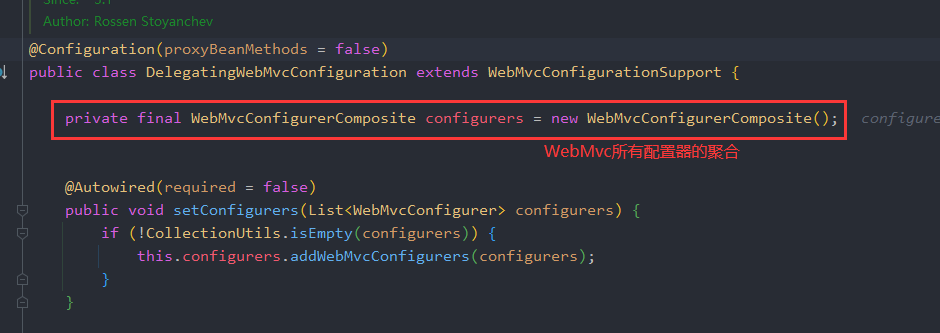
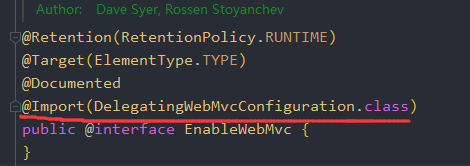
这个类会import一个内部类:WebMvcAutoConfiguration.EnableWebMvcConfiguration,EnableWebMvcConfiguration继承自DelegatingWebMvcConfiguration,DelegatingWebMvcConfiguration内部采用聚合技术,收集了所有的WebMvcConfigurer,并且保证所有的Configurer都会运行。
当我们创建一个自定义的WebMvcConfigurer时并实现addViewControllers函数时,spring容器就会通过viewControllerHandlerMapping自动将这个类识别到并添加到DelegatingWebMvcConfiguration的configurers中,然后调用configurers中的addViewControllers。

也就是说,这种情况就是spring只会使用你自定义的WebMvcConfigurer已经Override的方法,对于没有Override的方法,spring还是使用默认的WebMvcConfigurer中的方法。
如果要想取消这种默认的WebMvcConfigurer,需要在自定义的WebMvcConfigurer中加上@EnableWebMvc。
@EnableWebMvc
@Configuration
public class MyWebConfigurer implements WebMvcConfigurer {
    @Override
    public void addViewControllers(ViewControllerRegistry registry) {
        // 添加addViewController,取代RequestMapping(url)这样的配置
        registry.addViewController("/abc").setViewName("footer");
//        WebMvcConfigurer.super.addViewControllers(registry);
    }
}
为什么加了@EnableWebMvc之后,原有的WebMvcConfigurer就失效了?因为在WebMvcAutoConfiguration有一个注解@ConditionalOnMissingBean({WebMvcConfigurationSupport.class}),意思就是当spring容器中没有WebMvcConfigurationSupport这个bean时,WebMvcAutoConfiguration才会生效。
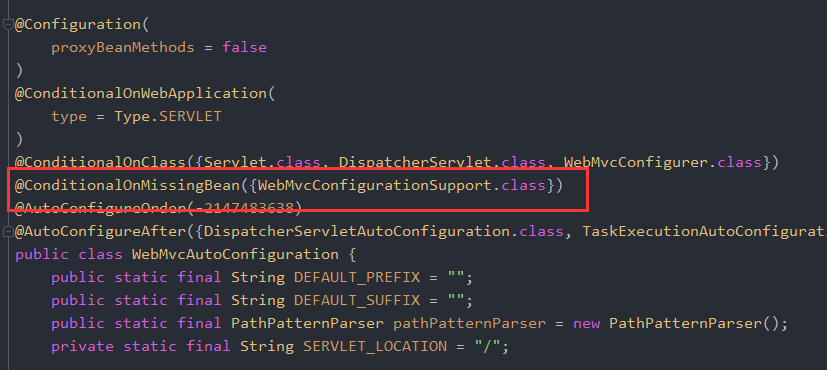
而当自定义类加了@EnableWebMvc之后,会引入WebMvcConfigurationSupport这个bean

官方参考文档:https://docs.spring.io/spring-framework/docs/5.3.8/reference/html/web.html#mvc